HTML
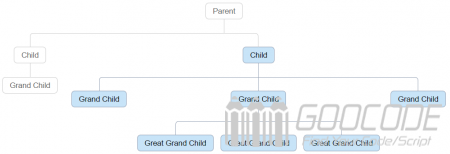
We use div # tree structure to contain the entire genealogy, ul and li elements inside to build a data source. The actual development of these genealogy data sources can be read from the database, like getting an infinite level of classification list, the following are the main html structure.
<div class="tree">
    <ul>
        <li>
            <a href="#">Parent</a>
            <ul>
                <li>
                    <a href="#">Child</a>
                    <ul>
                        <li><a href="#">Grand Child</a></li>
                    </ul>
                </li>
                <li>
                    <a href="#">Child</a>
                    <ul>
                        <li><a href="#">Grand Child</a></li>
                        <li>
                            <a href="#">Grand Child</a>
                            <ul>
                                <li><a href="#">Great Grand Child</a></li>
                                <li><a href="#">Great Grand Child</a></li>
                                <li><a href="#">Great Grand Child</a></li>
                            </ul>
                        </li>
                        <li><a href="#">Grand Child</a></li>
                    </ul>
                </li>
            </ul>
        </li>
    </ul>
</div>
CSS
We use the css: before,: after two pseudo-class content attributes to build the cable between the elements, while the use of the elements to achieve css3 rounded corners, plus a slide on mouse hover effect, so the mouse slide genealogy of a node element, the element associated with the younger generation will have a hover effect, complete css code is as follows:
.tree ul {
    padding-top: 20px; position: relative;

    transition: all 0.5s;
    -webkit-transition: all 0.5s;
    -moz-transition: all 0.5s;
}

.tree li {
    float: left; text-align: center;
    list-style-type: none;
    position: relative;
    padding: 20px 5px 0 5px;

    transition: all 0.5s;
    -webkit-transition: all 0.5s;
    -moz-transition: all 0.5s;
}

/*We will use ::before and ::after to draw the connectors*/

.tree li::before, .tree li::after{
    content: '';
    position: absolute; top: 0; right: 50%;
    border-top: 1px solid #ccc;
    width: 50%; height: 20px;
}
.tree li::after{
    right: auto; left: 50%;
    border-left: 1px solid #ccc;
}

/*We need to remove left-right connectors from elements without
any siblings*/
.tree li:only-child::after, .tree li:only-child::before {
    display: none;
}

/*Remove space from the top of single children*/
.tree li:only-child{ padding-top: 0;}

/*Remove left connector from first child and
right connector from last child*/
.tree li:first-child::before, .tree li:last-child::after{
    border: 0 none;
}
/*Adding back the vertical connector to the last nodes*/
.tree li:last-child::before{
    border-right: 1px solid #ccc;
    border-radius: 0 5px 0 0;
    -webkit-border-radius: 0 5px 0 0;
    -moz-border-radius: 0 5px 0 0;
}
.tree li:first-child::after{
    border-radius: 5px 0 0 0;
    -webkit-border-radius: 5px 0 0 0;
    -moz-border-radius: 5px 0 0 0;
}

/*Time to add downward connectors from parents*/
.tree ul ul::before{
    content: '';
    position: absolute; top: 0; left: 50%;
    border-left: 1px solid #ccc;
    width: 0; height: 20px;
}

.tree li a{
    border: 1px solid #ccc;
    padding: 5px 10px;
    text-decoration: none;
    color: #666;
    font-family: arial, verdana, tahoma;
    font-size: 11px;
    display: inline-block;

    border-radius: 5px;
    -webkit-border-radius: 5px;
    -moz-border-radius: 5px;

    transition: all 0.5s;
    -webkit-transition: all 0.5s;
    -moz-transition: all 0.5s;
}

/*Time for some hover effects*/
/*We will apply the hover effect the the lineage of the element also*/
.tree li a:hover, .tree li a:hover+ul li a {
    background: #c8e4f8; color: #000; border: 1px solid #94a0b4;
}
/*Connector styles on hover*/
.tree li a:hover+ul li::after,
.tree li a:hover+ul li::before,
.tree li a:hover+ul::before,
.tree li a:hover+ul ul::before{
    border-color:  #94a0b4;
}

