HTML
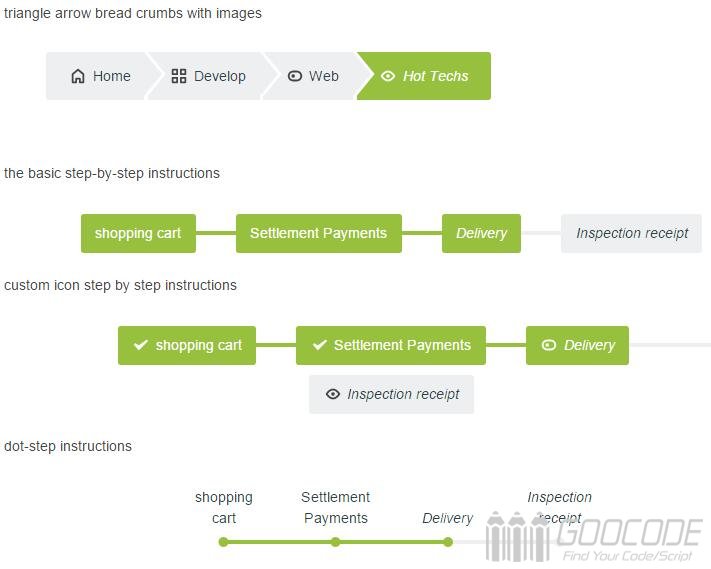
HTML structure is very simple, an ordered list of ol, outside the package.
Breadcrumb navigation structure, we give ol with class style: .cd-breadcrumb, then the current location of the class li plus class style:.
<nav>
	<ol class="cd-breadcrumb">
		<li><a href="#0">Home</a></li>
		<li><a href="#0">Develop</a></li>
		<li><a href="#0">Web</a></li>
		<li class="current"><em>Hot Techs</em></li>
	</ol>
</nav>
Multi-step instructions, we add the class style to ol: .cd-multi-steps, the completed steps of li plus the class style: .visited, the current step li plus the class style: .current.
<nav>
	<ol class="cd-multi-steps text-center">
		<li class="visited"><a href="#0">shopping cart</a></li>
		<li class="visited" ><a href="#0">Settlement Payments</a></li>
		<li class="current"><em>Delivery</em></li>
		<li><em>Inspection receipt</em></li>
	</ol>
</nav>
CSS
First, we use the :: after pseudo-element to create a separator element, that is, split between the levels.
.cd-breadcrumb li::after, .cd-multi-steps li::after {
  display: inline-block;
  content: '\00bb';
  margin: 0 .6em;
  color: #959fa5;
}
If you need to use a custom delimiter, you can customize the style. Custom-separator, and add styles to the [ol /] element, for example:
<nav>
	<ol class="cd-breadcrumb custom-separator">
		<li><a href="#0">Home</a></li>
		<li><a href="#0">Develop</a></li>
		<li><a href="#0">Web</a></li>
		<li class="current"><em>Hot Techs</em></li>
	</ol>
</nav>
The style of the separator is done. The custom-separator is written like this:
.cd-breadcrumb.custom-separator li::after,
.cd-multi-steps.custom-separator li::after {
  /* replace the default separator with a custom icon */
  content: '';
  height: 16px;
  width: 16px;
  background: url(../img/cd-custom-separator.svg) no-repeat center center;
  vertical-align: middle;
}
If you like to give breadcrumb navigation and sub-step instructions with small icons, you can write these styles, in this case we use the svg file for icon handling.
.cd-breadcrumb.custom-icons li > *::before,
.cd-multi-steps.custom-icons li > *::before {
  /* add a custom icon before each item */
  content: '';
  display: inline-block;
  height: 20px;
  width: 20px;
  margin-right: .4em;
  margin-top: -2px;
  background: url(../img/cd-custom-icons-01.svg) no-repeat 0 0;
  vertical-align: middle;
}
.cd-breadcrumb.custom-icons li:not(.current):nth-of-type(2) > *::before,
.cd-multi-steps.custom-icons li:not(.current):nth-of-type(2) > *::before {
  /* change custom icon using image sprites */
  background-position: -20px 0;
}
.cd-breadcrumb.custom-icons li:not(.current):nth-of-type(3) > *::before,
.cd-multi-steps.custom-icons li:not(.current):nth-of-type(3) > *::before {
  background-position: -40px 0;
}
.cd-breadcrumb.custom-icons li:not(.current):nth-of-type(4) > *::before,
.cd-multi-steps.custom-icons li:not(.current):nth-of-type(4) > *::before {
  background-position: -60px 0;
}
.cd-breadcrumb.custom-icons li.current:first-of-type > *::before,
.cd-multi-steps.custom-icons li.current:first-of-type > *::before {
  /* change custom icon for the current item */
  background-position: 0 -20px;
}
.cd-breadcrumb.custom-icons li.current:nth-of-type(2) > *::before,
.cd-multi-steps.custom-icons li.current:nth-of-type(2) > *::before {
  background-position: -20px -20px;
}
.cd-breadcrumb.custom-icons li.current:nth-of-type(3) > *::before,
.cd-multi-steps.custom-icons li.current:nth-of-type(3) > *::before {
  background-position: -40px -20px;
}
.cd-breadcrumb.custom-icons li.current:nth-of-type(4) > *::before,
.cd-multi-steps.custom-icons li.current:nth-of-type(4) > *::before {
  background-position: -60px -20px;
}
Of course, we can also set the triangular arrow divider, the code is as follows:
.cd-breadcrumb.triangle li::after,
  .cd-breadcrumb.triangle li > *::after {
    /*
        li > *::after is the colored triangle after each item
        li::after is the white separator between two items
    */
    content: '';
    position: absolute;
    top: 0;
    left: 100%;
    content: '';
    height: 0;
    width: 0;
    /* 48px is the height of the <a> element */
    border: 24px solid transparent;
    border-right-width: 0;
    border-left-width: 20px;
  }
  .cd-breadcrumb.triangle li::after {
    /* this is the white separator between two items */
    z-index: 1;
    -webkit-transform: translateX(4px);
    -moz-transform: translateX(4px);
    -ms-transform: translateX(4px);
    -o-transform: translateX(4px);
    transform: translateX(4px);
    border-left-color: #ffffff;
    /* reset style */
    margin: 0;
  }
  .cd-breadcrumb.triangle li > *::after {
    /* this is the colored triangle after each element */
    z-index: 2;
    border-left-color: inherit;
  }
  .cd-breadcrumb.triangle li:last-of-type::after,
  .cd-breadcrumb.triangle li:last-of-type > *::after {
    /* hide the triangle after the last step */
    display: none;
  }
You can also add classes such as: .text-center, .text-top, and .text-bottom to align the position of the text. You can also add classes such as count to mark the number of steps, as in the following code:
<nav>
	<ol class="cd-multi-steps text-bottom count">
		<li class="visited"><a href="#0">shopping cart</a></li>
		<li class="visited" ><a href="#0">Settlement Payments</a></li>
		<li class="current"><em>Delivery</em></li>
		<li><em>Inspection receipt</em></li>
	</ol>
</nav>
A variety of styles can be added to see the demo demo, our demo gives nine different examples, view the page source code you will have a harvest.

